Trouble playing this killer bassline? Here are some (hopefully) useful tipps for mastering it!
Hello bassplayers,
in this tutorial, I will talk about with four different topics with regards to Jamiroquai’s „Love foolosphy“. These four topics cover some technique / exercises that helped me getting along with this awesome bassline. If you are not so keen to reading, have a look at the video; this covers everything that is going to be written here.
I’ve also made a Play Along / Bass cover of the song, which you can find here: Love Foolosophy – Jamiroquai [Bass cover]
#1 Double Dead Notes
Okay, topic number one deals with these double dead notes, that appear throughout the entire song. What do I mean with „double dead notes“? Well, in this case, this refers to two 16th notes which are played as dead notes. One example is shown on the picture at the right side. [By the way, all the examples from the tutorial video can be downloaded as PDF and Guitar Pro file in the download section below. ]
The entire pattern, in which these „double“ dead notes are, so to say, embedded is:
Root – Octave – Deadnote 1 – Deadnote 2 – Octave – Fifth
Your right hand is the key!
Playing especially these two deadnotes in a row can be challenging. But don’t worry! It’s a matter of dealing with it the right way. Therefore, focus on your right hand when playing. The key is to decide for a pattern of the right hand, that does not change when repeating the groove. Use the following pattern to practice the example:
i-m-i-m-i-i
A pretty equal pattern except the two last notes, where rakingPlaying two successive notes with the same finger, in this case: the index finger. Drop down from the D to the A string. After note 2 has been played, the index finger drops again and rests on the E string eventually. is used.
Start slowly; give your brain and especially your right hand enough time to „digest“ this pattern.
#2 Hammer-ons
Okay, I’m pretty sure you know how to play a hammer-on! But how often have you played a hammer-on with your ring finger … ? This can be challenging, since it is so much more comfortable to play a hammer-on with the middle finger.
With regards to the examples shown in the video, playing the hammer-on with the ring finger does make absolutely sense. Why? Because of the context! What context? I mean the preceding note after the hammer-on.
The notation on the left is example 2 in the video. Preceding the hammer-on is a root-octave pattern played with index finger and the pinkie. Due to the high pace ( ~125 BPM) there is no time to change the fingering of the left hand. Thus, it it good practice to play the F and F# on the A-string with middle and ring finger (F# hammered then!).
Then, your index finger has enough time to target the A on fret 7 of the D-string.
#3 Double plucks
As you can see in the example on the right side, two plucks appear one after the other. This pattern is often used in the song. The best way to approach these two notes is by means of a double pluck. The strings are „popped“: The first pop is played with the index, the second pop with the middle finger.
This is pretty comfortable due to – you name it:) – the context! Just look at the example on the right. There is a big movement going on with 3 strings that have to be skipped.
The double pluck helps to create a comfortable movement of the right hand; it contributes to a good flow, since it is closer to the note that follows the double pluck.
Try it yourself: Play this part once with both notes popped only with the index finger, then a second time with the double pluck, which I’m sure will alleviate the way you play this part.
#4 Quick tipp for the bridge
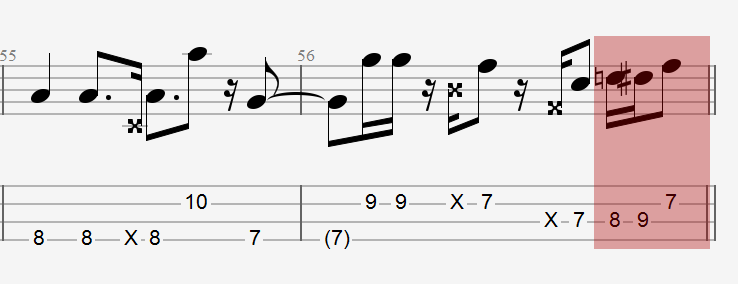
Similar to topic #1, it is very helpful to establish fixed patterns – be it for the right or the left hand. Especially for this part of the bridge (see example on the left).
These fixed patterns help to improve your progress. Somehow logical. Why? Because then, your brain can concentrate on the coordination of your right and left hand per se. It does not need think about: „How do I use the left hand? Do I start with index or middle finger or do I change with every repetition?“ I hope my point becomes clear. One distraction less that your brain has to worry about.
Anyway, once again, also the good old context enters the stage. Apart from the huge string skipping which is necessary here, the note following the pop is also on the same fret as the pop. (Both on fret 7). Thus, if you pop with your middle finger here, your index finger has enough „freedom“ to stay close to the E-string. Very beneficial at this pace!
Just try it out yourself. Enjoy:)
The show is over …
Alright fellas, that’s it for the moment. I hope, my thoughts on this wonderful bassline help you / inspire you when playing it. I would really appreciate to get some feedback of you for future tutorials. Write a comment, share this page or just send me some bass hearts:) I’m looking forward to hearing of you guys. Don’t forget to download the examples.


